Flaky and tender fried samosa are one of the most popular recipes in North Indian cuisine. They feature a pastry-like crust but are filled with savory potatoes and peas for a hearty, delicious snack. This step-by-step guide will help you to make the flakiest, tastiest, absolutely best Punjabi samosa from scratch!

About this Recipe
What makes this the best homemade samosa recipe? My foolproof instructions will guarantee that your potatoes and peas samosa are hearty with a perfectly flaky, crispy crust.
I use a bit less water than some other recipes to make my dough, which creates an ever flakier and crave-able samosa crust. (This is also the trick I use to make samosa pie, which is a great non-fried alternative to traditional samosa.)
Plus, the filling in these Best Punjabi Samosa is just fantastic. It’s super easy to prepare in a stovetop pressure cooker or using an Instant Pot and in a pan on the stove. Green peas and potatoes are blended with classic Indian spices for a warm, satisfying stuffing that will keep you wanting more.
TRENDING VIDEO
With a perfect crust and comforting filling, this recipe is a real winner! Give it a try and you’ll be amazed at how simple and fun it is to make samosa from scratch at home.
Our personal favorite is and will always be a Punjabi samosa which is what this recipe is all about. The classic potato and green peas stuffing in this recipe is adapted from my cooking school notes.
I have also made a video which shows the shaping, stuffing and deep frying the samosa. You can have a look at the video in the recipe card below, if the photos don’t help.
How to Make Samosa
Below is my complete step-by-step guide with photos for making the best Punjabi samosa from scratch.
You start by making the savory filling and pastry dough. Then assemble the samosa, fry, and enjoy with your favorite dipping sauces and chutneys!
Making the Stuffing
1. The first step to homemade samosa is to cook the potatoes and peas for the filling.
- To cook the potatoes and peas in a stovetop pressure cooker: Place 3 medium-sized whole potatoes (300 to 450 grams) and 2 to 2.5 cups water in a 3 or 4 litre pressure cooker. On top of the potatoes carefully set a small trivet and pressure cooker-safe bowl with ½ cup green peas. Pressure cook for 5 to 6 whistles or 7 to 8 minutes on medium to medium-high flame.
- If using an Instant Pot: Place 3 medium-sized whole potatoes in the steel insert of a 6 quart IP. Add 2 cups water. Place a trivet on top of the potatoes, and on top of the trivet set a bowl with ½ cup of green peas. Pressure cook on high for 20 to 25 minutes.

2. For the stovetop pressure cooker, remove the lid after all the pressure falls in the cooker. For the Instant Pot, do a quick pressure release after 5 to 7 minutes. Check with a knife or fork to see if the potatoes are cooked well.
The knife or fork should be able to slide through easily if the potatoes are cooked properly.
If the potatoes are undercooked, then cook them for a few more minutes using the pressure cook function. Once done, drain the potatoes and peas in a colander and set aside to cool.

3. Next, toast the spices. This will help to release their flavors and should not be skipped!
To a small frying pan over low heat add ½ inch cinnamon stick, 1 clove (optional), 1 green cardamom, 3 black peppercorns, ½ teaspoon cumin seeds, ½ teaspoon fennel seeds and 2 teaspoon coriander seeds.
Heat the spices for just a few minutes until aromatic, being careful to not burn.

4. Remove the spices from the heat and allow to cool completely. Then, put them in a spice grinder or small mixer-grinder jar.

5. Grind the toasted spices to a semi-fine powder, and set aside.

6. Peel the skin off of the cooked potatoes, and chop them in ½ to 1 inch cubes.

7. In a small skillet, heat 1 tablespoon oil and crackle ½ teaspoon cumin seeds until fragrant. I used mustard oil as it really adds a punch in the stuffing. You can use a neutral oil like sunflower oil, safflower oil, grapeseed oil or canola oil.

8. Keep the heat on low and add 1 teaspoon finely chopped or minced ginger and 2 teaspoons finely chopped green chillies. Sauté for a few seconds until the raw aroma of ginger goes away.

9. Now you can switch off the flame or keep flame to a low. Then add the cooked green peas, ½ teaspoon red chilli powder, 1 pinch of asafoetida (hing), the dry ground spice mix that we made and 1 to 2 teaspoons dry mango powder (amchur).
The mango powder is what gives the samosa filling its signature tangy flavor that balances so well with the savory, spicy flavors of the other stuffing ingredients.

10. Stir together and sauté for a minute. You can add less or more dry mango powder depending upon personal taste. I added 2 teaspoons as just 1 teaspoon was not quite enough sour flavor for me.

11. Next add potato cubes, salt as required and 1 tablespoon chopped coriander leaves (also known as cilantro) to the skillet.

12. Mix very well and sauté for a minute. Check the taste, and add more of the spices, salt or dry mango powder if needed. Cover and set the filling aside while you make the dough.

Making the Dough
13. In a large mixing bowl combine 2 cups all-purpose flour (250 grams), 1 teaspoon carom seeds, 1 teaspoon salt and 6 tablespoons ghee (50 grams).

14. With your fingers, mix the ingredients together until they make a breadcrumb-like texture that holds its shape when you press a portion of the mixture.

15. Then, working just a bit at a time, add in 7 to 8 tablespoons water in parts and knead. You can add 1 to 2 tablespoons extra water if needed if the dough looks floury or dry.

16. Continue kneading to form a firm, tight dough. It should not be soft or sticky. Cover the samosa dough with a moist kitchen towel and let rest for 30 minutes.

Assembling and Shaping
17. After the dough has rested, divide it into 6 to 7 even pieces. Take each piece and gently roll in your palms first to smooth and soften. Place it on your work surface or on the rolling board.

18. Then roll it with a rolling pin, being mindful to keep the thickness even at 1 mm and not too thin.

19. Cut the with a knife or a pastry cutter, right through the center of the samosa pastry.

20. Use a rolling pin to gently flatten the half moon shape to make even.

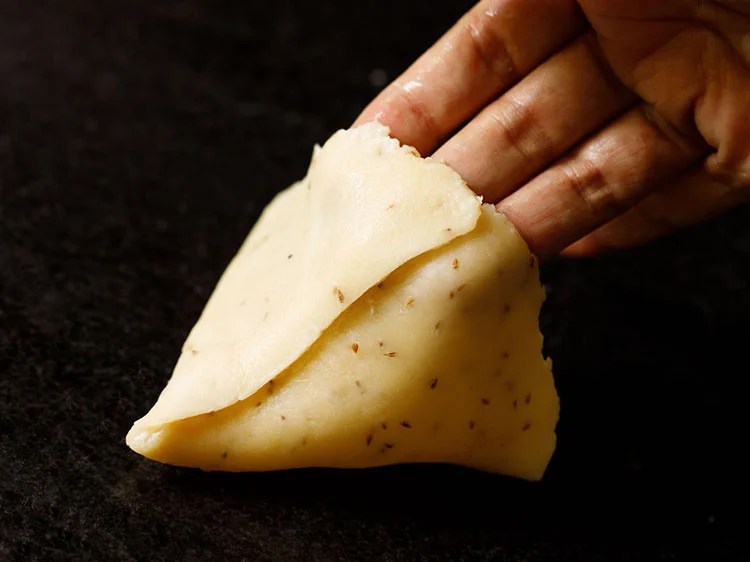
21. Use a pastry brush to lightly brush the samosa dough with water around all of the edges.

22. Next, fold to join the straight edged side together to form a cone, like shown in the photo below. Be sure to press the edges well so that they are sealed!
The samosa cone is now ready to be stuffed with the potato and pea filling.
23. Carefully spoon and lightly pack the prepared potato and pea stuffing into the samosa cone. Make sure to not over or under-fill to prevent the samosa from bursting during the frying process.

24. Crimp and pinch the edges to close as shown in photo below. This helps the samosa to stand once made.

25. Evenly press all of the edges, making sure there are no cracks in the dough. The edges should be sealed very well so that the stuffing does not come out while frying.
Prepare all the samosa this way as described above, and cover with a moist kitchen napkin to keep the samosa from drying out.

Frying Samosa
The final step to making the best Punjabi samosa from scratch is to fry them to a perfectly crispgolden brown. Use any neutral flavored oil to deep fry – sunflower oil, canola oil, vegetable oil, safflower oil, grapeseed oil are some options.
26. Heat the oil for deep frying in a kadai or pan. Test the oil by adding a small piece of dough – it should come up quickly if the oil is hot enough for frying.
Once the oil becomes hot, gently slide 3 to 4 of the prepared stuffed samosa into the oil, and then immediately reduce the flame to low. Do not overcrowd the pan to ensure each samosa fries evenly!

27. Fry the samosa on a low to medium-low heat, keeping an eye on them so they don’t burn.

28. When one side is pale golden, use tongs or a slotted spoon or skimmer to gently turn the samosa over and continue frying.

29. Fry until each samosa is crisp and golden. The oil will stop sizzling once the samosa are fried well.

30. Use a skimmer to carefully remove fried samosa from the oil, and place them on paper towels to remove extra oil. Repeat the frying steps with the remaining samosa.

31. Serve Punjabi samosa hot or warm or at room temperature with coriander chutney or tamarind chutney, or with a zesty tomato sauce. The combo of samosa with masala chai is irresistible and much loved.

Stuffing Variations
There are many variations in a samosa stuffing depending on the region and state in India.
- In Delhi and Punjab, potatoes alone or a combination of peas and potatoes are common – where the potatoes or peas are not crushed or mashed. The potato cubes are cooked perfectly but in shape with a few green chilli pieces in the filing. There is a some sourness in this stuffing as dry mango powder or dry pomegranate powder are added. A few more spices are added as well.
- In some variations, raisins are also added which gives the samosa a sweet-sour taste. Sometimes cashews are also added for some crunch.
- In some places, the filling is totally mashed with plenty of spices added.
- If the green chilies are not added in the filling then fried green chilies are usually served separately.
- Some people also add ginger-garlic paste and on few rare occasions, I have found chopped carrots pieces also in the stuffing.
- A variation with mix vegetables is also made. Veggies like peas, carrots, cauliflower and potatoes are added.
- Onion samosa is another variation where a spiced mixture of onions and poha (flattened rice) is filled in the samosa.
- Sweet samosa is also made with a stuffing of khoya (mawa), nuts and dry fruits. This is made usually during festivals like Diwali or Holi. These samosa are also known as khoya samosa or dry fruit samosa.
- A variation is also made with paneer cubes added in the stuffing.
- Cocktail samosa is a small sized samosa stuffed with a dry filling of spices, nuts and dry fruits.
Expert Tips
So you must be wondering what should be the perfect proportions of ingredients in the pastry dough and the correct frying method – to get that flaky and crispy crust. I break it down for you in detail.
1. Proportion of fat
The amount of fat (which we call as “moyen or moyan” in Hindi) has to be in the correct proportion in a samosa pastry dough. One of my culinary expert friend always suggests to add ⅕ of fat to 1 part of flour in weight.
Example: For 1 kilogram of flour, you have to add 200 grams of fat. In this samosa recipe, I have kept the same ⅕ proportion of fat – which is 50 grams for 250 grams of flour.
2. Proportion of water
A samosa crust dough has to be kneaded to a tight and firm dough. The dough should not be soft like a bread or roti dough. So you need to add less water when kneading. The amount of water that will be added depends on the quality of the flour. Thus add water in parts when you knead the dough.
3. Rolling samosa crust
You have to roll the crust evenly keeping 1 mm thickness all over. Do not roll the crust too thick. A thick crust will take up plenty of frying time resulting in a hard texture.
Do not roll the dough too thin. It won’t be able to contain the potato stuffing and burst in oil. So do keep in mind these tips while rolling the dough.
4. Two frying techniques
There are two frying techniques to get that perfect crispy flaky crust in a samosa.
1. Frying at a low temperature
In this method, firstly heat the oil at a medium or medium-high temperature. Then add the samosa into the hot oil. As soon as you add the samosa to the hot oil, reduce the heat to a low or medium-low and fry samosa on a low heat.
This ensures that they do not absorb too much oil. If you directly put the samosa in a less hot oil, they soak up too much oil. If you fry samosa in a very hot oil, then tiny air bubble pockets can form on the crust and the inside part of the crust will be undercooked.
2. Frying twice
This is a little lengthy method and the one which I will suggest you to try while making samosa if you have plenty of time. In this method initially you have to lightly fry the samosa not allowing them to become golden – just that the dough should look cooked.
Add the samosa in hot oil and remove them when the crust has become opaque and creamish white. Fry until lightly fried so that when you remove them they will not break. Set them aside. Then lower the heat of oil and fry the samosa again until they are golden.
With both the methods, the final samosa will be crisp & flaky from outside and cooked well from inside – like the one you get in the markets and there will be no air pockets on the crust.
How to make Samosa in an air fryer
If you have an air fryer then do try making samosa in it. You will be pleasantly surprised with the texture of the air fried samosa. They do taste similar to the fried samosa, minus the extra oil.
For air-frying, preheat air fryer at 180 degrees celsius for 10 minutes. Brush samosa with oil and air fry at 180 degrees celsius till the samosa are golden.

FAQs
I have compiled below answers to questions based on the queries asked by readers in the comments.
Yes, you can do that. In fact many Indian recipes that use (all purpose flour) can be easily made with whole wheat flour. Just remember to add more water while kneading as whole wheat flour absorbs more water.
Add 1 teaspoon lemon juice to the potato stuffing. If you have dried pomegranate powder, then add 2 teaspoons of it.
You can freeze the samosa. Either shape them and then freeze or you can first fry them till the crust becomes opaque and then freeze them. This way the samosa will stay better for a longer time. Before frying, let the samosa come to room temperature and then fry. If fried when they are still cold, then they absorb more oil.
A few air pockets are fine, but the samosa should not be covered with a lot of air pockets. If the samosa dough is soft, then the air pockets occur on the crust. Too much moisture in the dough makes the crust soft as well as gives it plenty of air pockets. While frying, if the oil is too hot, air pockets appear on the crust.
1. If using puff pastry sheets, then bake samosa. You can even air fry.
2. For spring roll wrappers, you can either fry or bake them.
3. With phyllo dough sheets bake the samosa.
Usually in an authentic Punjabi samosa, onions and garlic are never added. But we can always make our own variations and be creative. So you can add onions and garlic if you prefer.
Samosa can become soft due to two reasons. Either the dough is soft or the oil is at a too low temperature while frying. When you knead the dough, make sure that dough is tight and stiff. It should not be soft like bread or roti dough.
The first method is to slit the green chillies keeping them whole. Shallow fry or deep fry them till you see a few light golden blisters on them. Later sprinkle some salt on the fried green chilies and mix. You can also sprinkle some chaat masala or amchur powder.
The second method is to stuff a mixture of amchur powder (dry mango powder) and salt in slit green chilies. Shallow fry them and then serve.
You can easily store it for a couple of hours at room temperature. If you don’t plan to eat them at all, then store them in an air-tight box (dabba) in the fridge. When serving you can warm them on a tawa or in an oven.
You can warm it on a tawa (griddle) or oven until warm (at 170 degrees celsius in a preheated oven) and have them with bread, pav (dinner rolls) or roti. A great way to use them up is the awesome Indian street food of Samosa Chaat.
Yes. To make a vegan samosa, use a neutral tasting oil instead of ghee (clarified butter) while making the dough crust.
Yes of course you can air-fry samosa. Please do read the air-frying part I have described above.
Yes definitely. Bake in a preheated oven at 180 degrees celsius for 30 to 35 minutes until the crust becomes crisp and golden.
More Popular Indian Snacks


If you made this recipe, please be sure to rate it in the recipe card below. If you’d like more delicious Indian vegetarian recipes delivered straight to your inbox, Sign Up for my email newsletter. You can also follow me on Instagram, Facebook, Youtube, Pinterest or Twitter for more vegetarian inspiration.


Like this Recipe?
Pin it Now to Remember it Later
This recipe post from the archives (November 2013) has been republished and updated on 13 November 2020.
Comments are closed.
256 Comments
As Seen In:


Your recipes are very good they are very helpful if we ever have any celebration we can quickly prepare delicious snacks easily
Thanks a lot and glad to read your feedback.
This is the first page which I look for whenever I want to try a new recipe… And it has never failed me…be it eggless chocolate cake for my kid’s birthday or a simple chutney for the humble idli. Looking to make stuffed rosette breads using samosa filling. This looks simple and tasty! Thanks for all your efforts!
Sheetal
Thanks a lot Sheetal. Glad to read your lovely comment and feedback. This filling tastes very good. I am sure it will taste good in stuffed rosette bread. Most welcome.
I’ve been following your recipes for a long time now. The way you explain, no one does. So intricate and the tiny little tips are wonderful. Thank you, for being there😍
Thanks a lot Swati and glad to read your feedback. Most welc Happ